
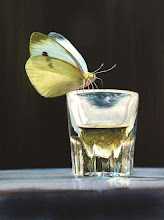
Step 1: First, find yourself a bug
It's easy. They're everywhere. But take note... It helps if your bug is really slow or, better yet, completely stiff. Mine is a tarantula hawk wasp I put to sleep when I was in high school (like 26 years ago already). When they are alive they pack a whopper of a sting, so try to find a nice quiet one like old blue here.
Step 2: Stretch your paper.
Oops – sorry, no photo for this step. Okay, just type "stretching watercolor paper" into google images and see what you get. If you're curious about the details, I prefer to work on Arches 140 lb. hot press (smooth) paper… but always stretched! This is an important step. The sponging of the paper surface during stretching is critical to make the paper more receptive to the paint. Get the paper totally soaking wet for five minutes, sponge it down flat on a smooth piece of plywood, and secure the edges with 2-inch kraft tape. Note that some artists and well-intentioned art store employees will try to tell you that painting on a watercolor block is equivalent to painting on stretched paper, but I'm here to tell you… they are all living a lie! So please stretch paper now, before you continue…

Step 3: Lay in some washes
Once your stretched paper is completely dry, start painting in some light, flat washes using just three primary colors… cyan, magenta and yellow. Hey, just like your printer! But why these three, you ask? Well, different colors are made with pigments that have other properties besides the color. With watercolor, because the medium is so thin and runny -- it's water, after all -- you really notice the other properties, like particle size, for instance. Many pigments are coarse and large-grained and slow to spread across a wet page, which is just fine for rustic landscapes and splashy duck-hunting scenes, if that's your bag. But for close-range bug work I vastly prefer fine-grained, synthetic staining pigments that won't lift off when I paint over them, and you will soon learn to love them too. Specifically, these pigments are phthalocyanine blue (green shade), quinacridone magenta, and winsor or hansa yellow. You can mix nearly every hue you might want from just these three -- well, okay, not really -- but more so than with the standard primaries red, blue and yellow. (Okay, no doubt there are those gamut-geeks out there who will want to argue this point, or to make the case for split primaries, but please save the gas for your own blog, thanks!) There's one more important thing you need to know about these colors, though… We've all heard people say how watercolor is unforgiving, and they're pretty much right on with this gripe, but here's even more bad news… these particular pigments are super-DUPER-unforgiving. They are aggressive and tenacious and stainy little bastards, so please don't let them get too dark yet! Not right here in step 3. It's sort of like adding salt when you're cooking. You can always add more later if you need it. But taking it out is… like… Well, in the watercolor biz we call this starting over.

Step 4: Fill in the background.
Using the three staining colors, plus Payne's gray, start to fill in the background. You can blot the edges of washes with paper towels to produce a gradation or blur effect. And use a hair dryer on low setting to ensure speedy and uniform drying. Otherwise pigment particles will collect at the wet/dry boundaries and form hard lines. That's fine if you want to be a hard-liner, but I prefer more subtle gradations. And for us truly obsessive types, complete control is everything... You are the artist -- take command of your medium! The overall plan with watercolor is to get the whole composition laid in at the same low contrast level, like an underdeveloped photo. If you make a mistake at this point, you might be lucky enough to rewet it and lift it (mostly) off with a dry paper towel. Or try rubbing lightly with a slightly wet nylon bristle brush to convince the paper to let the color go. I finally had to lightly scratch off a few goofs from my wasp painting with an x-acto knife after the paper became tired of all this wet reworking. But be aware that if you try to paint over any areas where the paper has been manhandled like this, you will be very, very, VERY sorry!!! Once it has been roughed up, even the best paper will never take the paint quite right again.

Step 5: Gradually increase the contrast
This is where those staining colors more than make up for their unforgiving stainy-ness. How, you ask? Well, the beauty is that you can wash over them repeatedly to get ever-increasing color density without the previous washes lifting off or muddying (much). But be sure to keep some areas pure and white and 100% paint-free for maximum contrast with your deep many-layered washes. This is important – these white spots will be the focal points of your image. So if you lose the white of the paper, the whole game is lost.

Step 6. Remove the tape (before and after views)
Oh no, I forgot to mention the tape! Okay, here is the retroactive suggestion… Use drafting tape to mask the edges BEFORE YOU START! Sorry. Here’s the trick -- you can use a T-square to draw a rectangle well inside the kraft tape holding your paper down. Then put a long piece of drafting tape along each edge of this rectangle. Use only drafting tape, never artist tape or masking tape, and rub it down firmly to ensure complete contact, especially where the pieces overlap at the corners. Use additional tape to mask all the way out to the kraft tape. If you had done this at the beginning, then you could peel it off now at the end to get these nice, sharp, crisp borders. And if you want to be completely annoying, you could start signing your paintings backwards so everyone assumes they are digital prints. All this makes for good, head-scratching fun at your gallery openings.
Okay, that's all. Cut through the kraft tape with a utility knife to get your paper off the drawing board, and then trim off the tape edges with scissors or paper cutter. The time required to complete a painting this size is normally 2 - 3 days. Longer if you prefer to sleep at night. Anyway, thanks for reading this far, and congratulations on your new bug painting!
If you are interested in seeing this particular wasp in person, please visit the Art Murmur Gallery booth at the Bridge Art Fair this week in Miami, FL. Details are at www.artmurmur.com.

1 comment:
thank you - much appreciation for your sharing -
glad i found it - cheers
Post a Comment